2013-03-30

SciFi Saturday – Orbital Variants

In the Star Frontiers: Knight Hawks Tactical Operations Manual, spaceships and stations are allowed to orbit a planet by moving one hex (10K km) away from the planet, reducing speed to zero, and thereafter traveling one hex around the planet each turn. 
A ship that is orbiting a planet has a speed of zero. However, the ship automatically moves one hex around the planet each turn. The direction of the orbit (clockwise or counterclockwise) is up to the player who controls the ship. [SFKH Tactical Operations Manual, p. 4]

In reality, objects are not limited to orbiting a planet from only 10K km away; in fact, it could be from any distance within the planet's Hill Sphere (e.g., 1.5 million km for our own). Furthermore, orbital velocity is determined by a rather simple calculation based on a gravitational constant, mass of the planet, and orbital radius: v = √(G×M/R), and for an Earth-sized planet (as portrayed on the boardgame counters), the 1-hex/turn speed is not actually correct. The proper velocity would be a bit less than half that (decreasing the further away you get), and so one of my top house rules is to adjust the standard orbital speed to ½-hex per turn (see here).

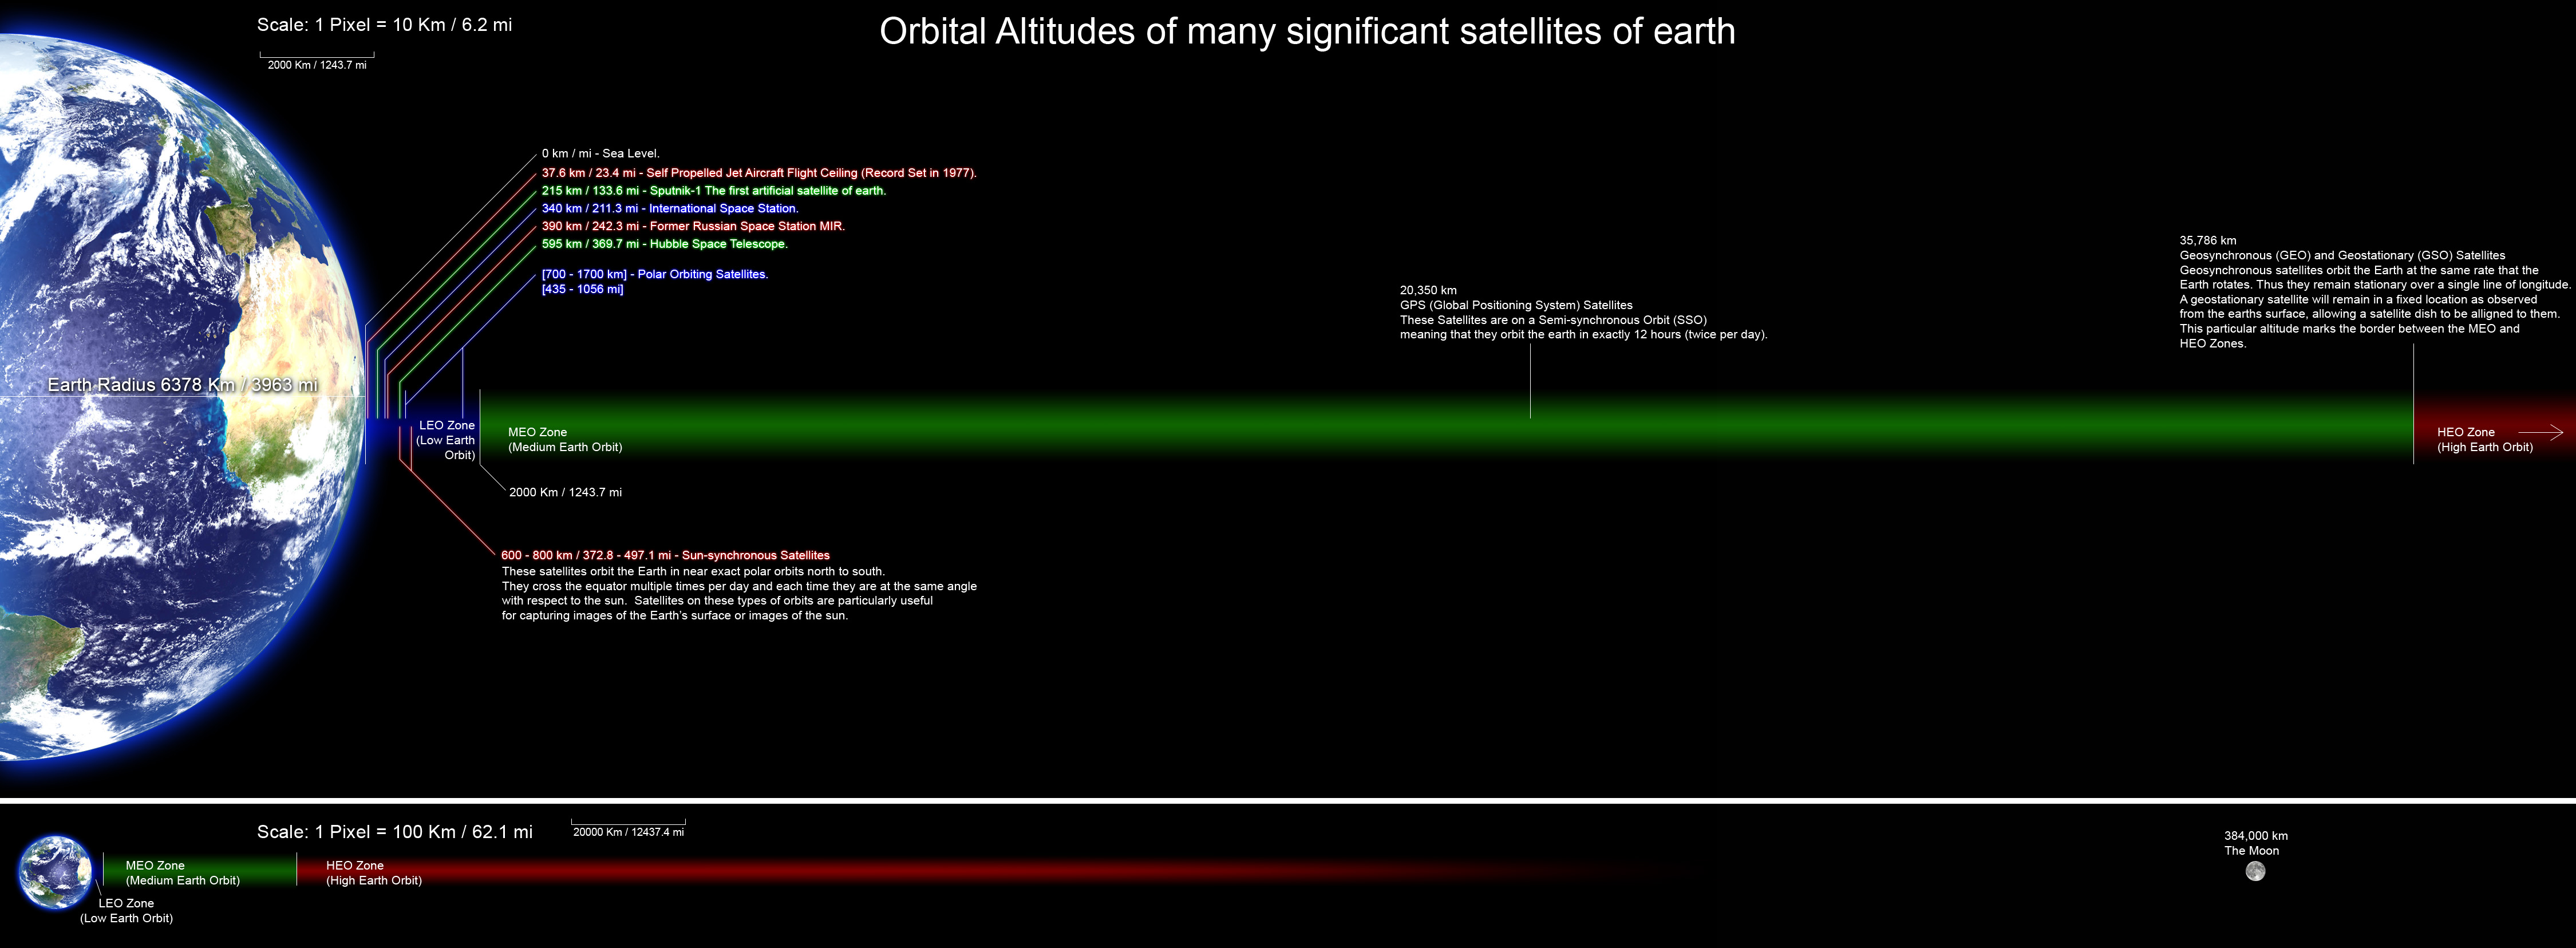
Now, the reason for doing this is not just empty realism, although if no other gameplay problems arise, then I do think there is a benefit to attempting the "highest degree of realism" (see golden rule). Nor is the point simply an educational exercise, although I think there is a benefit to that, too. The real gameplay payoff is that this sets the stage for a variety of different orbital action at different distances and planetary masses. See the following graphic for some examples of real orbital possibilities (and get the open document spreadsheet here):


Here's some analysis for Earth-size planets (basically like all of the populated worlds in the Star Frontiers universe):
  • No such planet can support any orbit of 1-hex/turn; the necessary orbit would be literally deep inside the planet itself.
  • Low Earth Orbit, where most of our real-world satellites, space stations, and manned spaceflight have gone, is a bit less than a full hex from the planet's center, at a velocity of a little under ½-hex per turn, and circles the globe in 12 turns (2 hours).
  • Middle Earth Orbit, such as 2 hexes distance, would be at a speed of about 1/3 hex per turn, completing the orbit on the hexmap in 36 turns (6 hours).
  • Semisynchronous Orbit (SSO), matching that of all GPS satellites, would be about 3 hexes from the planet, with a speed of 1/4 hex per turn, going around every 72 turns (half a day).
  • Geosynchronous Orbit (GSO) would be 4 hexes away, at a speed of 1/6 hex per turn, making a cycle every 144 turns (one day).
  • High Earth Orbit would be anything further away than 4 hexes; for example, our own Moon would be positioned about 40 hexes away, traveling at an orbital speed of 1/16 hex per turn (completing a cycle in about a month's time, of course).
But other possibilities exist if we introduce larger-than-Earth sized planets into the game such as the gas giants in our own Solar System:
  • Neptune-like planets would in fact support a 1-hex/turn orbital velocity at the closest possible position, 3 or 4 hexes from the center of the planet. A middle orbit distance of 5 or more hexes away would be at ½-hex per turn speed.
  • Saturn-sized planets would have the closest possible orbit at 7 hexes from the planet's core, also at a speed of about 1-hex per turn. In fact, the same would be true for any orbit established between 7 and 25 hexes away. Further away than that, and a speed closer to ½-hex per turn would be more appropriate. 
  • Jupiter-style planets with their powerful gravitational field would allow a faster orbital velocity of over 2 hexes per turn at anything from 8-20 hexes from the planet's core. Further away than that (anywhere on the standard hex map), and a speed of 1-hex per turn is still attainable.
Side note on the last bullet: The official TSR-produced Star Frontiers module 2010: Odyssey Two Adventure (based on the movie sequel to 2001: A Space Odyssey) includes a realistic hexmap of the Jupiter system, and because of the great distances at which its gravity is felt, this map is at ×10 the normal Knight Hawks map scale (i.e., 1 hex = 100,000 kilometers). More generally, all of the significantly-sized moons for the gas giants are off the map at normal scale.

So consider adding a wider array of planetary locations and gravity effects to you Knight Hawks games; variety is the spice of life, and if you can broaden your players' minds, so much the better. Below I've included images of some gas-giant planets that you can print (at 72 pixels per inch) and use in your game for this purpose. (Neptune is about 5 hexes in diameter, Saturn is about 12, Jupiter 15.) Finally, I've got reference links at the bottom if you want to read more on the issue of real-life orbital variations.


Reference links:

2013-03-23

SciFi Saturday – Unwrapping UPF Minis

In 1983, when the Star Frontiers: Knight Hawks game came out, I was barely a teenager and didn't have money for paraphernalia such as the spaceship miniatures produced in conjunction with the game. However, I did stare at them lustfully for long periods at the hobby shop in the mall nearest to me (which was about a half-hour drive into the next state).

Nowadays I deprecate use of miniatures for role-playing like D&D (they hinder creative monsters or surprise encounters to the available miniatures, and at least as important, slow down the action), but I do think they're perfect for war-gaming situations where you have a fixed list of available assets for the players to choose from competitively (see also: Book of War for D&D-compatible easy-to-play miniature wargame rules).

Maybe about a decade ago I bought boxes of the Knight Hawks miniatures on EBay, but for whatever reason, I left them in the shrink wrap, and left them unopened in my closet for the duration. Then in the last few months (doing some research for this year's SFKH posts), I read a warning on BoardGameGeek.com that there was a problem with the packaging material inside that would potentially degrade the miniatures:
Due to the nature of the boxes the games come in, they react with the lead minis and start a self sustaining process of destruction. The lead dissolves and crystalizes into a fine powder and if left unchecked it can destroy a figure. It also makes the minis potentially *VERY* dangerous to your health touch! I'd strongly advise against buying the minis "Mint Sealed in Box" as that means you are very likely buying a box of little better that lead dust in worst cases. [http://boardgamegeek.com/thread/698529/kh-miniatures-and-lead-rot-warning]
So between this and the 30th anniversary of the Star Frontiers: Knight Hawks game, I figured it was time to end the suspense, finally bust these suckers open, and see exactly what we have inside. Below you can see some photos from a few weeks ago as I opened and assessed the box of UPF (good-guy) ship miniatures.

First -- Here's the "Federation Ships" box still in its mint shrink-wrapped state.


Starting to cut it open as carefully as I can. (Notice that in traditional X-mas-morning style, I'm doing this while still wearing my pajama bottoms.)


Removing the shrink wrap.


Finally opening the box after waiting 30 years!


First thing on top -- the "Rules and Conversions" booklet, with miniature-specific conversion rules and a cut-down game that could potentially be played by people lacking the SFKH boxed set. I'll post more about this on a future date.


Taking off the top layer of packaging material and here's how the miniatures are originally packed. Nothing looks to bad at first glance; now let's check out the individual ships.


Assault Scout -- The ubiquitous, UPF-only, PC-carrying scout ship, looking fine here. (At first I think I'm missing one of the two assault scouts shown on the cover, but then I find that the 2nd one's somehow fallen underneath the packaging to the bottom of the box. Which saves me from writing a 30-year late complaint letter to TSR.)


Civilian Freighter -- Looks fine, a little flashing and the struts just a bit out of alignment; easily fixed.


Frigate -- The nose is a little bent out of shape (is that a cliche?), but other than that this looks great.


Destroyer -- Now, this is described as a "Destroyer" on the box-cover and conversion rulebook, but it's a bit hard to make sense of that, since it's twice as long as the Frigate mini, and just about the same length as the Battleship miniature (in the game rules, the Destroyer is just minimally larger than a Frigate). It would really make more sense to interpret this as a Light or Heavy Cruiser, although the number of engines doesn't synch up for any of those types (2 shown on the mini, while the DD-CL-CA types are given between 3 and 6 engines in the rules). I'll probably call this a Light Cruiser of hull size 13 (which is more widely used by the UPF than the heavy cruiser). Additional point: It's practically the same size, a bit longer than, the Light Cruiser that comes with the Sathar Ships. In any case, it's a really nice sculpture with one of the engines just slightly bent.


Battleship -- So here's the mighty UPF Battleship with the whole fistful of parts that I've got to put together at some point, and can barely fit them in a photo all at once (plus, it's really heavy!). Kudos to the sculptor for creating the correct 8 engines as specified in the rulebook (again, one fell to the box bottom and didn't get in the picture). That's a really impressive piece of work.


Summary -- I actually can't find evidence of the lead "dissolving" on these miniatures at all, and they look really nice by my standards. Maybe the poster at BoardGameGeek is trying to drive down the perceived value of the boxes and corner the market, who knows. At any rate, I'm actually really glad to finally get inspired to open the boxes and check out the contents inside. Still to come: (1) opening the box of Sathar Ships, (2) checking out that Rules and Conversions booklet, and (3) actually painting, assembling, and playing with these classic miniatures.

2013-03-16

SciFi Saturday – Strategy Tips

The following are some general strategy tips and observations that I thought I'd share in relation to the Star Frontiers: Knight Hawks space combat game:


First-attacker advantage is always important. Being able to get in the first shot with the devastating torpedoes and assault rockets, degrading the enemy and likely eliminating some ships, frequently dictates the course of the game. Any way you can arrange to be the first moving player to launch attacks is a good idea.

With a little forethought, it's usually pretty easy to stay out of the 3-hex-wide range of forward-firing cannons on the approach into an enemy ship (so as to avoid that particular defensive fire). Even better, getting set up behind a slow-turning capital ship is a great idea, as they probably can't turn around to use a cannon on their turn, either. So is using any planet's gravity well to get an extra hex of turning when needed.

Counter-intuitively, I find that small fighters and assault scouts don't make great advance cover units, as they are easily destroyed. Consider: in contrast to WWII ship combat, there is no real aerial benefit, as the enemy capital ships can “fly up” and catch them at will. So I reverse this usage, and try to have my largest and most powerful ships engage first as a shock force, and then have smaller ships fill in afterward (ideally from behind or to the sides).

More on fighters and scouts: Their assault-rocket attacks are ideally set up from exactly 4 hexes away. There's no range penalty for this, and it prevents capital ships from firing back rocket batteries (3 hex range), which are deadly to the smaller ship types. (I consider the resulting penalty to the scout's laser battery to be negligibly important.)

Selecting targets for your weapons (prior to resolution) is basically a probabilistic packing problem. Two obvious goals that you need to balance off each other are: (a) eliminate or degrade enemy ships/weapons as soon as possible with focused fire, but (b) don't waste damage points! (This latter point is the fundamental insight that I used to program the trainer AI for the Star Trek: ConQuest Online game, or analyze D&D Hit Dice, for instance.) So what is frequently a good idea is to aim your heavy-duty torpedoes at a big, healthy ship (so as to get the full benefit of all those damage points, without overflow), and then use your smaller battery weapons to finish off a second ship that's near-death. Of course, you never want to launch a torpedo at a fighter or scout, because of their special ability to dodge away from them (and it would be wasteful of the torpedo's big damage payload even if it did hit).

Interceptor missiles (ICMs) are nearly useless against rocket battery attacks (another rather obvious point, when you look at the combat table). So I generally save ICMs for torpedo attacks, and then aggressively use either a half or full load against any such attack (lest the ICMs go unused later); use against assault-rocket attacks may also be reasonable in some cases.

Defensive screens are of limited use. Since masking screens disappear with any move change, I only find use for them with orbiting structures or otherwise crippled, fleeing ships. Since the advanced proton/electron screens symmetrically help against one weapon and hurt against another, I don't think I've ever activated either of them in all my years of play.

Referring back to the very first point (first-attacker advantage always important), consider the Campaign Game, where the Sathar's only victory condition is to destroy the space stations in each star system -- and by the book, the Sathar player gets first option to declare attacks, first-move, and the ability to choose any starting speed in the battle. So then I've found it trivially easy to pick the speed exactly halfway across the map, land directly on the station in the first turn (before the UPF can respond, move, or raise shields), and launch an unstoppable attack that destroys even the most powerful orbiting Fortress. Then my ships jump off the other end of the map on the next turn and head for the next star system. This strategy is so broken, it basically spoiled the one time I tried to play the full Campaign Game (with me as prime abuser), and  it's why the #1 house rule I have is to limit all starting speeds to 10 hexes/turn.


Anyone have other tips that I've overlooked here?

2013-03-09

SciFi Saturday – Blown Cover Scenario

Here's a third new scenario for the Star Frontiers: Knight Hawks game. This one reverses the usual role of Sathar and UPF -- here, it is the Sathar that start in orbit around a small moon, and a UPF Assault Carrier group (with a half-full cohort of Fighters) which serves as the attacking force. Playtests have shown this to be quite difficult for the Sathar player (perhaps exacerbated by the need to switch the normal usage in the player's head, from attack to defense), but I've managed to win in that role. I won't give any more hints -- you'll have to figure out the best strategy on your own.

Remember that in our house rules, orbiting vessels move 1/2 hex per turn (one hex every other turn). And don't forget the dedicated roster sheet for Fighters, presented earlier.


Scenario Delta-3: BLOWN COVER

A task force of Sathar ships have been inserted into orbit around a small moon in the Cassadine system, hidden by the nearby asteroids and gas clouds. Here, they perform surveillance and wait for an opportune time to attack the UPF worlds. But fortunately, a UPF carrier force patrolling nearby has happened to detect them, and now quickly moves to strike.

UPF Ships
  1. UPFS McCormick (Assault Carrier with 4 Fighters)
  2. UPFS Faith (Destroyer)
  3. UPFS Shimmer (Frigate)
  4. UPFS Daring (Frigate)

Sathar Ships
  1. SAV Black Ruin (Heavy Cruiser)
  2. SAV Viper (Destroyer)
  3. SAV Venomous (Destroyer)
  4. SAV Stinger (Frigate)

Setting Up. The moon in the Cassidine system is set in the middle of the map, in hex 2720. All the Sathar ships start in orbit around it (speed 0); the Sathar ships do not all need to be in the same hex. Then the UPF ships are set up on one of the short ends of the map, traveling at a speed of 10 or less. Fighters start on the carrier. The UPF player moves first (A), and the Sathar player second (B).

Victory Conditions. The Sathar player has two ways to win. Either (a) move the Heavy Cruiser safely off the map, or (b) drive all the UPF ships off the map. Any other result counts as a UPF victory.

2013-03-07

1000d4 Compares Dice by Company

Alan over at the 1000d4 blog made a truly delightful comparison of the d20's sold by a variety of different companies, so as to assess Lou Zocchi's old demonstration that GameScience dice are the best produced and have the most uniform distribution in shape. Pictures, statistics, and methodology are all there to tell the tale, you really should go take a look! (Spoiler: GameScience wins again, but maybe by not as much as we'd initially expect. Other unexpected conclusions, e.g., how Crustal Castle manufactures their dice.)

2013-03-04

Sunday Night Book of War

We had the good fortune of having our friends Matt & Kate over this weekend, while dinner cooked and the ladies played some Scrabble, Matt & I took the opportunity for a rematch in Book of War. Here's how that went down:

Start --We're playing just the Basic Game at 200 points; Matt's on the far side. For terrain, Matt first rolled the Stream element and rather wisely set it up in a broad arc, giving himself default ownership of most of the board (after which we placed the Rough and Woods pieces). Then he set up his red army: from left-to-right he has small units of Pikes, Heavy Infantry, Archers, Heavy Cavalry, Horse Archers, and a 2nd unit of Horse Archers. On the near side, my blue army: two units of Medium Infantry, Longbows, Heavy Cavalry, and a 2nd unit of Longbows.


Turn 2 -- The primary action is on the right; Matt moved up his Horse Archers and my Longbows engaged them at long distance. My longbows took out a single figure of horse archers, who succeeded at the resulting morale check. And then on the 2nd turn he eliminated all of my missile troops at a blow, as you can see below. This puts me at a terrific disadvantage; he has full control of the majority of the board, and my forces are stuck exposed in the open, unable to attack unless the stream is crossed.


Turn 4 --  Keeping my Heavy Cavalry in place on the right, I'm hoping to lure Red into rashly crossing the stream, but he's not taking the bait. While my heavy cavalry is immune to missile attacks at long range (frustrating the opponent a bit), on the next turn he'll move another inch forward and then be able to score a hit on my cavalry. I'm pushing my infantry slowly up through the Woods on the left flank, but you can see that the rest of his army is converging in that direction to meet them.


Turn 5 --  At this point, with no other prospects and nothing left to lose, I charge all of my forces forward. Fortunately on the far left, red's pikes were turned around (partly because they have no benefit in the woods, and he wanted to let other units through); my infantry have caught them in the rear and cut down the entire unit. On the near right, my heavy cavalry have gotten halfway through the Stream.


Turn 6 --  My infantry and cavalry have both lost a figure or two to missile fire, but our morale remains good. Near the stream, my heavy cavalry have burst out of the water, eliminating two figures and routing the last horse archer there. At far side of the board, my infantry press the attack, catching the the horse archers there and scoring a hit.


Turn 7 -- Red's horse archers are either routing from the table, or have turned face and fled from melee with my infantry. Those infantry have again surged forward, this time into the foot archers, and eliminated most of that unit. My heavy cavalry have hammered against red's heavy cavalry, but don't score any hits. Also, I have my other unit of medium infantry advancing in the Woods, hoping to surround and defeat red's Heavy Infantry there.


Turn 8 --  On the left, the red heavy infantry have struck against my medium troops, killed two figures, and routed the rest (so much for that hope). In the middle, my infantry haven't yet finished off the archers. On the right, red's running horse archers have drawn swords and struck against my heavy cavalry, and amidst the cavalcade of horses I've taken one hit.


Turn 10 -- While the armored horsemen rain blows upon each other (mostly to no effect), my medium infantry have managed to take the rear of red's heavy cavalry. Here the combined attacks eliminate one figure and the morale roll on the red dice is: Snake-eyes! This means the red heavy cavalry is effectively finished, although they'll stay and fight at a penalty because they're trapped between my two units. I've also finished off his lightly-armored horse archers here, too, leaving only red's heavy infantry; one more potent force to reckon with (once they finally get in contact).


Turn 12 -- While I'm finishing off the last of the enemy heavy cavalry, red's heavy infantry have hit the back of my infantry, routing them. They kill a figure while the rest now flee the board.


Turn 13 -- The final showdown. With the space in between finally clear, red's last unit hits my last unit; they get the "6" on one die needed to score a hit, taking down one figure, and forcing me to roll a morale check. I'm rolling two dice and adding +1 (for the remaining figure) and +2 (for cavalry hit dice), with the goal of at least 10 total. The dice roll: 6, meaning I've missed it by a single pip -- my cavalry rout in defeat, and Red has won the day!


Commentary -- Sometimes I think it's just sheer lunacy how often this game becomes a nail-biter like this, with the play coming down to the very last dice-roll between single units remaining on each side. Matt played extremely well for just his second wargame of ever; his intuition is pretty much spot-on as to use of both terrain and unit forces. Again, he complimented Book of War for its realism and how he can leverage his knowledge of medieval history into the game strategy. Personally, I was really happy with my own play (no glaring mistakes), and pleased with how I was able to battle back after the initial loss of all my missile troops, and being basically trapped in the narrow band between stream and board-edge. Once again, aggression pays off in forcing the issue to a conclusion, even if I didn't quite pull out the win here. It could definitely have gone either way at the end; a very satisfying game for both sides.


2013-03-02

SciFi Saturday – Fighter Rosters

For my Star Frontiers: Knight Hawks games, I do like to make use of the "Boardgame Ship Rosters" that are printed in the Campaign Book. You really need something to keep track of the paperwork regarding each ship's velocity, ammunition, damaged systems, etc. (when I was a teenager I'd use regular notebook paper, but it would end up looking completely garbled; so much easier now to run off some copies for clear communication). As noted earlier, for a given scenario I usually fill these sheets out in ink, make gameplay marks in pencil, and then erase and re-use at a later date.

Here's one minor problem with that process: It's pretty wasteful when a whole squadron of fighters are involved (based on a space station or assault carrier). They have very few hull points, only a single weapon system, they're never given any names in the boardgame rules or scenarios, etc., so most of the record space is wasted on them. And since each official sheet only has room for 4 ships, you'd have run off and maintain a whole bunch of sheets just for the fighters in each game.

So here's my solution: I made a dedicated roster, in the same style, just for Fighter-types. Cutting out the unnecessary information allows us to fit 8 of them on a single page. Knowing the statistics in advance allows us to pre-print them on the sheet and save time. And the statistics are the same for both the Basic and Advanced games (ignore DCR for Basic play; and I assume you know that they have Reflective Hulls like all military vessels). Just fill in the letter of each counter in use and you're good to go.

Another idea: Several places in the rules go back-and-forth about the limit on how many fighters a Carrier can carry (twelve on CB p. 5; ten on TM p. 8; eight on CB p. 55). For simplicity, we might establish this latter number (8) as the actual limit, so that one of these rosters conveniently represents all the fighters available on a single Carrier.


Download the PDF here.